2010-09-09

Polish marinated porcini mushrooms

Boletus edulis, more commonly known as porcini (meaning a piglet, did you know that?!) used to be served only in the noble houses in the Old-Polish era. Polish name of this mushroom, borowik, means 'a forest mushroom' and the popular name calls it prawdziwek meaning a true mushroom', both stressing its royal status among Polish mushrooms (by the way, the English name is penny bun or cep and the French cèpe de Bordeaux). They have something aristocratic in their look and their firm flesh makes a great base for many dishes. Mostly it would be boletus in cream or soup of dried mushrooms. One of the favourite ones are the pickles which are said to be perfect to go with Polish vodka. Thus it is unbelievable that boletuses were introduced to New Zealand and the South Africa...

Marinated boletus (marynowane prawdziwki)
For a 200 ml jar

100 g cleaned mushrooms cut into pieces
1 small onion, halved and sliced
300 ml water
1 tsp salt
pinch of sugar

Bring the water with spices to boil. Add mushrooms and onion and cook slowly for half an hour. Drain.


Marinade:
300 ml water
200 ml table vinegar (10%)
1 tsp salt
1 tsp sugar
5 allspice grains
5 peppercorns
1-2 bay leaves

Bring the water with spices to the 
boil, simmer for 5 minutes. 
Place mushrooms in a warm sterlized jar and carefully cover with boiling marinade. Quickly screw the lid on and turn over the jar. Leave it upside down until cold. That way it should be sealed well (with the lid concave). However if you are not sure if the jar is airtight, you can pasteurize it by placing the jar in a pot and pouring over the water nearly to the lid, bringing to boil and boiling slowly for 10 minutes or so. Then take the jar out and leave to cool.

Let the mushrooms marinate at least for a month. It keeps really well and makes a good gift when visiting friends from other countries;-)

This recipe applies to many types of mushrooms, among others chanterelle or the bottom mushroom. Enjoy!

2010-08-16

Not fancy for a liver?

This was a liver testing week for me. This happens if you buy a kilo of offal that your husband doesn’t eat. Following Peter Gordon’s tips on sautéing livers, I went from rumaki through liver and beans to the liver and plum paté. Imagine that you prepare your own homemade paté, you exactly know what is inside and there is nothing artificial! Not mentioning the whole mistery of making a paté! It is a good thing as a spread for a party canapés or simply to go with some cracers. Or with some toasts for the open-air breakfast...

Liver and plum paté


360 g chicken livers
50 ml red wine
5 Tbsp vegetable oil
130 g red plums
2 Tbsp honey
50 g butter salt

1. Wash the livers, remove the sinews. You can cut them into halves so they cook more quickly. Heat up the oil in the frying pan, place the livers when it’s very hot. Fry for a minute or two on one side, or until you see that the upper side changes the colour into some grey brown. Turn over and keep frying for another two minutes. The livers should be cooked through but still pink. Place on the sieve and let it cool down and drip the oil and some juices.

2. Remove stones from the plums, cut the fruits into small cubes, heat up the honey in the frying pan and cook the plums until they start to soften. Remove from the heat and leave to cool down.

3. Melt the butter. Put the livers, butter and wine in the food processor and blend well. Now’s the funny thing. You have to pass the paté through a sieve, using a spatula or by pounding the paté on the sieve with a ladle. 4. The rest is the easy task. Season well with salt, add plums with all their honey juices and mix well. Place in a container. It will keep at least for a week in a fridge. You should get 300 g of your own homemade paté.

Besides did you know that livers are actually more valuable as a source of vitamins, minerals and proteins than the meat itself? Chicken and duck livers are both tender and versatile in using. Apart from these, the best it is said are those of calf, than lamb’s livers. Beef’s, pork’s or sheep’s livers have stronger flavour. It is important to remove sinews and fibres. You can soak livers in milk for getting a fair colour. You don’t salt the livers until it is cooked, otherwise it will harden – a good exception from that is to marinate livers in the soy sauce. Stewed liver with the onion sauce is a classic Polish dish, equally loved and hated. Liver for a living?

2010-07-27

"News from Gosia’s kitchen" part 2 : Puff pastry

First dish which I made in wok was a puff pastry and golden beef.These easy, crispy pillows of pastry filled with spice beef and potatoes are delicious.
I made the pastry because it needs just a few minutes and is ready to eat for lunch or supper especially if you don’t have time or if you are so hungry after seasoning the wok like me.

What do you need to make it?

2 sheets puff pastry
1 tbsp sunflower oil
½ small onion
1 garlic cloves
1 tsp grated fresh root ginger
1 fresh red chili
2 tbsp curry powder
75 g minced beef
115 g mashed potato
4 tbsp chopped fresh coriander
Oil for frying
Salt and black pepper

Chop onion, garlic and chili. Heat the sunflower oil in a wok, add the chopped onion, garlic, chili, and ginger. Stir-fry over a medium heat for 3 minutes. Add the curry and beef and stir-fry over a high hest for 5 minutes, or until the beef is browned.

Transfer the beef mixture to a large bowl and add the mashed potato and coriander. Stir well, then season and set aside.

Lay the pastry on dry surface and cut out 8 rounds. Place a large spoonful of the beef mixture in the center of the pastry round. Fold each round in half to enclose the filling. Press and crimp the edges with the tines of fork to seal.

Fill a wok one-third full of oil and heat. Deep- fry the puffs, in batches, for 2-3 minutes until puffed up and golden brown. Drain on kitchen paper and serve garnished with fresh coriander leaves. Offer a small bowl of tomato ketchup for dipping.

Enjoy!

2010-07-26

"News from Gosia’s kitchen" part 1 : Wok- King

Last two months were busy for me.
I changed a flat and I had a few problems in my job, but now I’m back and start new series on my experience with wok, South - East Asian and Mexican cuisines.
I gave it a name "News from Gosia’s kitchen" and it will be not only about my current interests.

Let's start. One month ago I bought new professional wok with bamboo steamers. I was very excited and I wanted to cook immediately I read on the packaging the following instruction.


1) First wash the wok thoroughly in warm water and detergent to remove special Anti- rust coating.

So, it looked easy, but I was scrubbing it the whole hour, uff.

2) Rinse and dry thoroughly over your gas ring or electric hot plate.

3) Put in two tablespoons of cooking oil. When the oil is hot warm rub the interior with a paper towel until the whole surface is lightly coated with oil.


Be careful on fingers. I used silicon gloves, they are very useful.

4) Heat the wok slowly for about 15 min. and wiping occasionally with more oil....


This part was very easy. The wok heated while I was sipping wine from the glass and was reading wok meals recipes.

4a) you will see that it will start to darken in color. This means that your wok is becoming seasoned and with use will get even darker or almost black.

So, it meant my wok was ready to start a new part of my kitchen life. Now I use wok not only to cook Asian food. My wok is ideal to make Italian sauces for pastas and fillings for Polish pierogi. The rest of my pots are still in boxes, because now I use my new versatile pot – Wok-king.

But the king needs a lot of attention and I can't leave it for a long time alone and dirty after cooking because the rust also likes wok.
Wok is easy to clean. Once it’s seasoned the wok should never be washed with detergent.
I simply remove any food and wash it in hot water. Next I dry with paper napkin and rub a little oil into the surface. That’s all.

It is important to never use detergent or scrub during washing. If you do it or when rust appears you must season wok again.


So let’s start cooking... but in next episode, see you.

2010-06-20

Muffin rulez!

On the very important day of the presidential elections in Poland, on the 20th June 2010, I celebrate the draw won by Italy in the match with New Zealand. Well, actually I am celebrating New Zealand's success. I only pretended to be nice to the deceitul, simulating azzurri, shame on you!

Caramel Apricot Muffin
(presidential muffins)

1. Caramel:

200 g sugar
2 tablespoons white vinegar
2 tablespoons boiling water

Melt the sugar together with the vinegar on a low heat on the frying pan. When it reaches a nice colour, add delicately water, mix, heat up and place a thick layer of the caramel on the bottom of the all oiled holes in your muffin tin.

2. Place halves of the apricots on the caramel bottoms.
(You can alternatively place them later on the top of the dough).

3. Prepare the dough:

3 eggs
100 g flour
80 g sugar
2 tablespoons oil
1 teaspoon of the vanilla aroma

Beat the egg whites, than slowly add sugar and beat until all the sugar dissolves. Lower the mixer rotation, add egg yolks, oil and aroma, mix briefly. Add the flour and mix really carefoully, you can use your mixer also. Divide the dough equally between the separate tin holes.

4. Bake at 175 degrees for 25 minutes.

5. Take out of the oven, leave for 2 minutes and remove the muffins from the tin, placing them upside down on the wire rack.
That WAS yummy.

2010-06-14

Smart way for baking the loose dough

Today I discovered a new way of baking the rye bread. As you know this bread is difficult to form and bake because the dough can hardly keep its shape. If you don't have a basket for proofing, this is the idea for you!

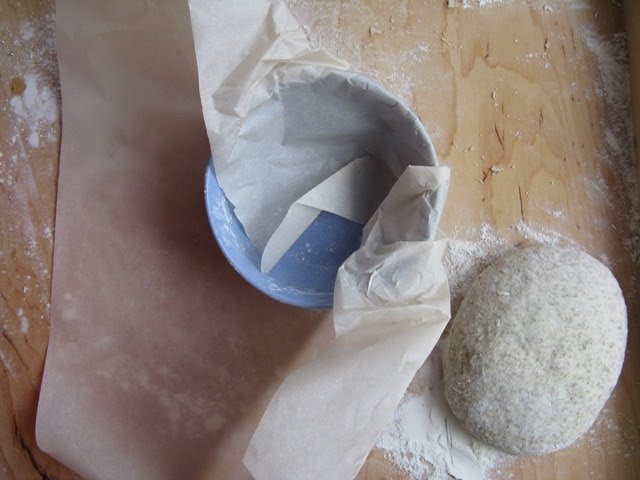
Cut a piece of a parchment paper, place a bowl of the desired bread size in the center and wrap the dish.
Oil the inside of the 'paper bowl' and dust with flour if you prefer. Then carefully remove the bowl and wrap the paper itself into the bowl's shape.
Place the shaped loaves in your paper moulds. Now arrange the moulds on the baking tray leaving some space between separate breads. Cover with a wet cloth and leave for proofing.
Brush or dust the risen bread and cut the top as you do normally.
Admire and enjoy the look and the smell of the ready loaves. Now's the time for taking pictures actually!
No mercy for a single slice!

2010-06-01

Beer soup - a must for a beer lover

As we are talking about the Old Polish (baroque) cuisine it is necessary to mention the beer soup. It was a custom to start a day with this noutritious soup or another in kind of borsch or a soup made of the fermentated rye flour.

The beer soup was extremely popular not only to its distinctive flavour (you know what I mean) but also due to the fact that it supplied the people with vitamins (vitamin B and niacin) that could be hardly achieved within their dull and simple diet. The proteins from the yeasts (contained in beer) supplied them with all the indispensable amino acids. That was so important as the peasants usually don't eat much meat but mainly grains. The gentry ate it with cheese and eggs added. It must be a nice dish especially that many of the nobility were producing their own beer. The habits has changed much since then. The fashion of eating bread for breakfast came from France in the XVIII century and it finally won. We don't eat the nourishing soups in the morning today but commonly we eat sandwiches.

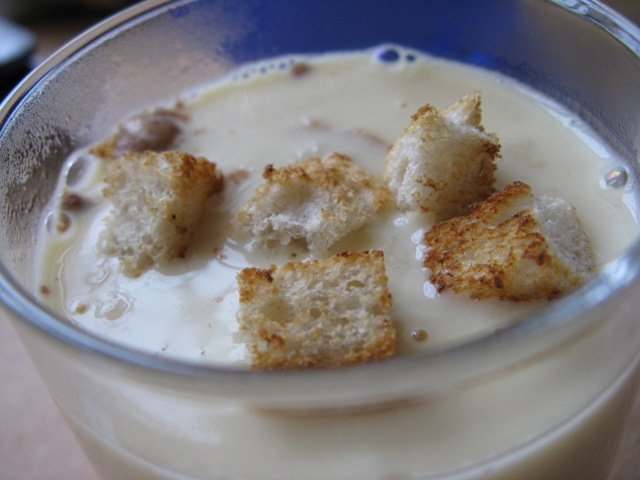
Beer soup with croutons- recipe

500 ml beer
150 g sour cream (18% fat) or double cream
2 egg yolks
2 slices of bread (preferably Russian rye bread)
3 Tbsps sugar
pinch of cinnamon

1. Cut the crust off the slices and cut the crumb into small cubes. Brown the cubes on the dry frying pan.
2. Cut the bead crust into small segments. Keep 2 tablespoons of beer separately. Bring to boil the rest of beer with the crust. Let it become overcooked.
3. In a pot mix the cream with the egg yolks, the cold beer and a tablespoon of sugar.
4. Slowly add the warm beer to the cream, stirring constantly. Place on the stove and heat slowly, stirring. Heat it well but do not boil! (Aha, here you can smell the amazing almond aroma).
5. In a bowl or a cup place a teaspoon of sugar and a dash of cinnamon. Pour in the soup and sprinkle with the croutons.


Makes 2-4 portions, depends on how you like the soup. I warn, if you use a strong beer, you will get a strong, aromatic, a little bitter soup with this amazing almond aroma. The soup does not become thick but still i can fill you up. Croutons are generally not necessary for that. If you like beer, this soup is really great.

LinkWithin

Related Posts Plugin for WordPress, Blogger...